Shopify Integration Guide
This guide outlines the steps required to connect your Shopify store to Helm. Once the integration is complete, you’ll be able to automatically sync orders, products, and inventory levels between systems
Last updated 9 months ago

There are two methods to set up Shopify
Use Dc Credentials - Easiest.
Using DC Credentials
Choosing this option means you're connecting Shopify to Helm via your existing Despatch Cloud (DC) credentials:
This method uses the API key and secret stored in your Helm account.
Helm acts as a middle layer between Shopify and your other connected systems.
It's useful if you're already using Helm for other integrations, as it keeps all your credentials centralised.
Typically chosen by users who want a standardised setup across multiple channels.
Using Access Token
This method connects Shopify to Helm directly using a Shopify access token.
You generate the access token in Shopify by creating a custom app and copying the API credentials.
This setup bypasses DC credentials entirely and connects straight to your Shopify store.
Often preferred for new integrations or when you want more control over which permissions the integration has.
Recommended by Shopify for secure, modern API access.

OPTION 1 - DC Credentials
Connect Your Shopify Store to Helm (Using DC Credentials)
Follow the steps below to integrate your Shopify store into Helm using Despatch Cloud / DC credentials.
Step 1: Get Your Shopify Domain
Log in to your Shopify admin panel.
Go to Settings > Domains.
Click on your preferred domain.
Copy the Shopify domain (e.g.
mysurfshop.myshopify.com).
Step 2: Add the Shopify Channel in Helm
In Helm, go to Settings > Sales Channels.
Click Add Channel.
Choose Shopify from the list.
Set the channel to Active.
Enter a name for the channel, such as
MySurfShop Shopify.In the Hostname field, paste your Shopify domain (e.g.
mysurfshop) - only the subdomain, not the full URL.Select Use DC Credentials.
Leave the Access Token field blank.
For API Key and Password, type
TESTandTEST- these will be automatically replaced by the system.Tick Download Products if you want Helm to pull products from Shopify.
Step 3: Configure Your Channel Settings
Click on the Settings tab of your new Shopify channel.
Choose your Warehouse for incoming orders.
Click on the Brand tab and make sure your return address is filled in.
Optionally customise other settings, such as adding your logo or branding preferences.
Adjust any additional options as needed.
Step 4: Save and Authorise
Click Save Changes.
You’ll now be prompted to log into Shopify and authorise Helm to access your store.
Follow the prompts to allow access.
Once authorised, your Shopify store is connected and ready to sync with Helm.
OPTION 2 - Access Token
Step-by-Step Setup for using the Access Token
Step 1: Access the Integration Page
Log in to your Helm account.
Navigate to:
Settings → Sales ChannelsFrom the list of available channels, select Shopify.
Step 2: Create a Shopify Custom App
To authenticate your Shopify store with Helm, you will need to create a Custom App in Shopify and generate an Admin API Access Token.
Log in to your Shopify Admin Panel.
From the left menu, click Apps.
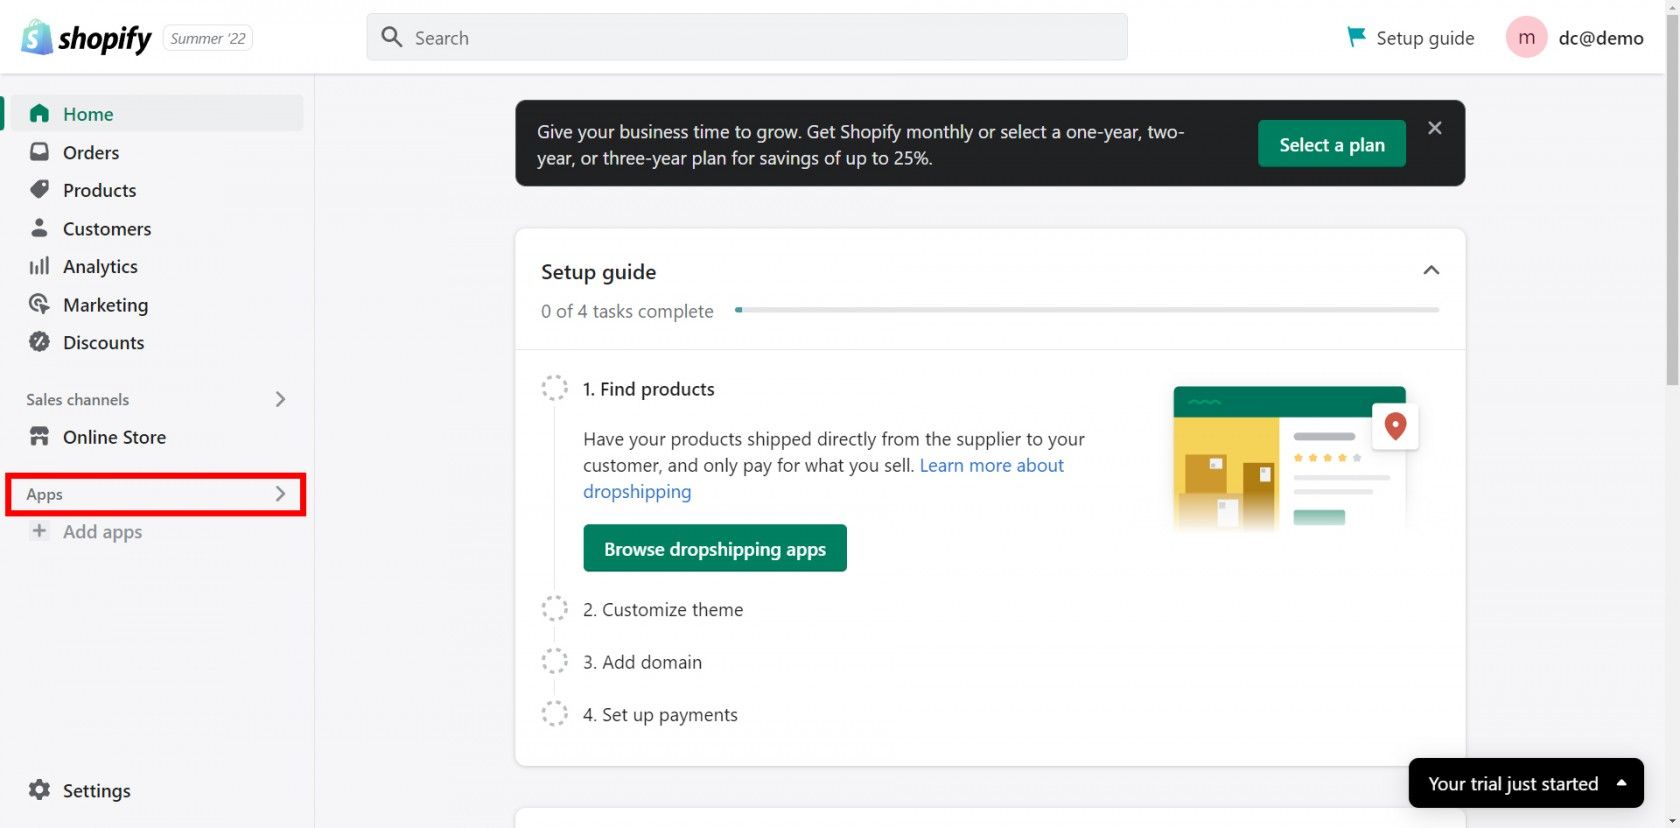
Click to maximise the image
Click App and sales channel settings.
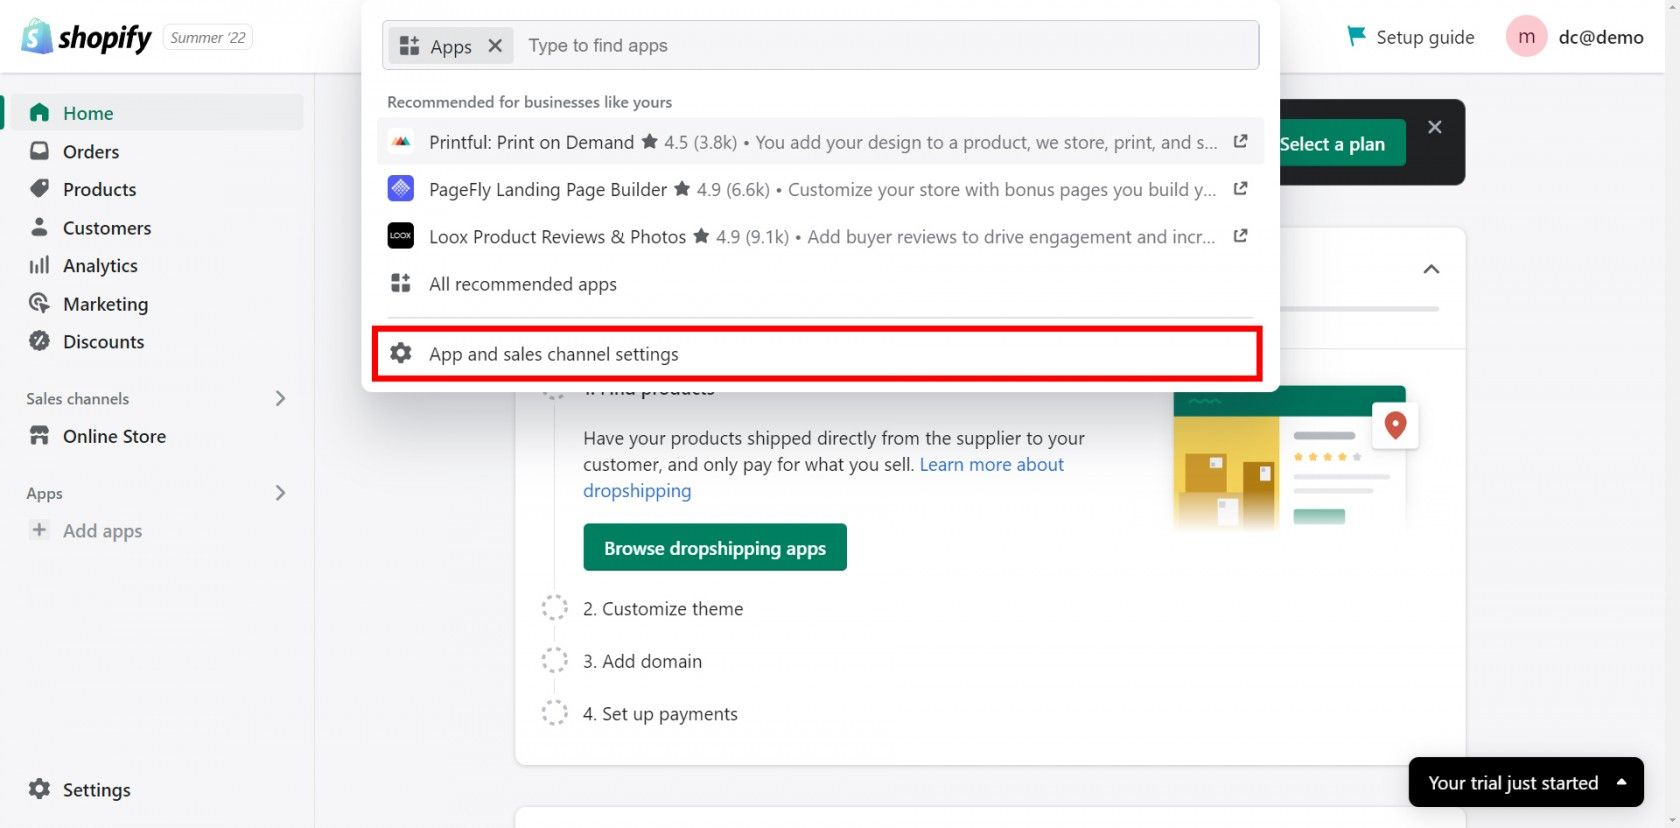
Click to maximise the image
Select Develop apps.
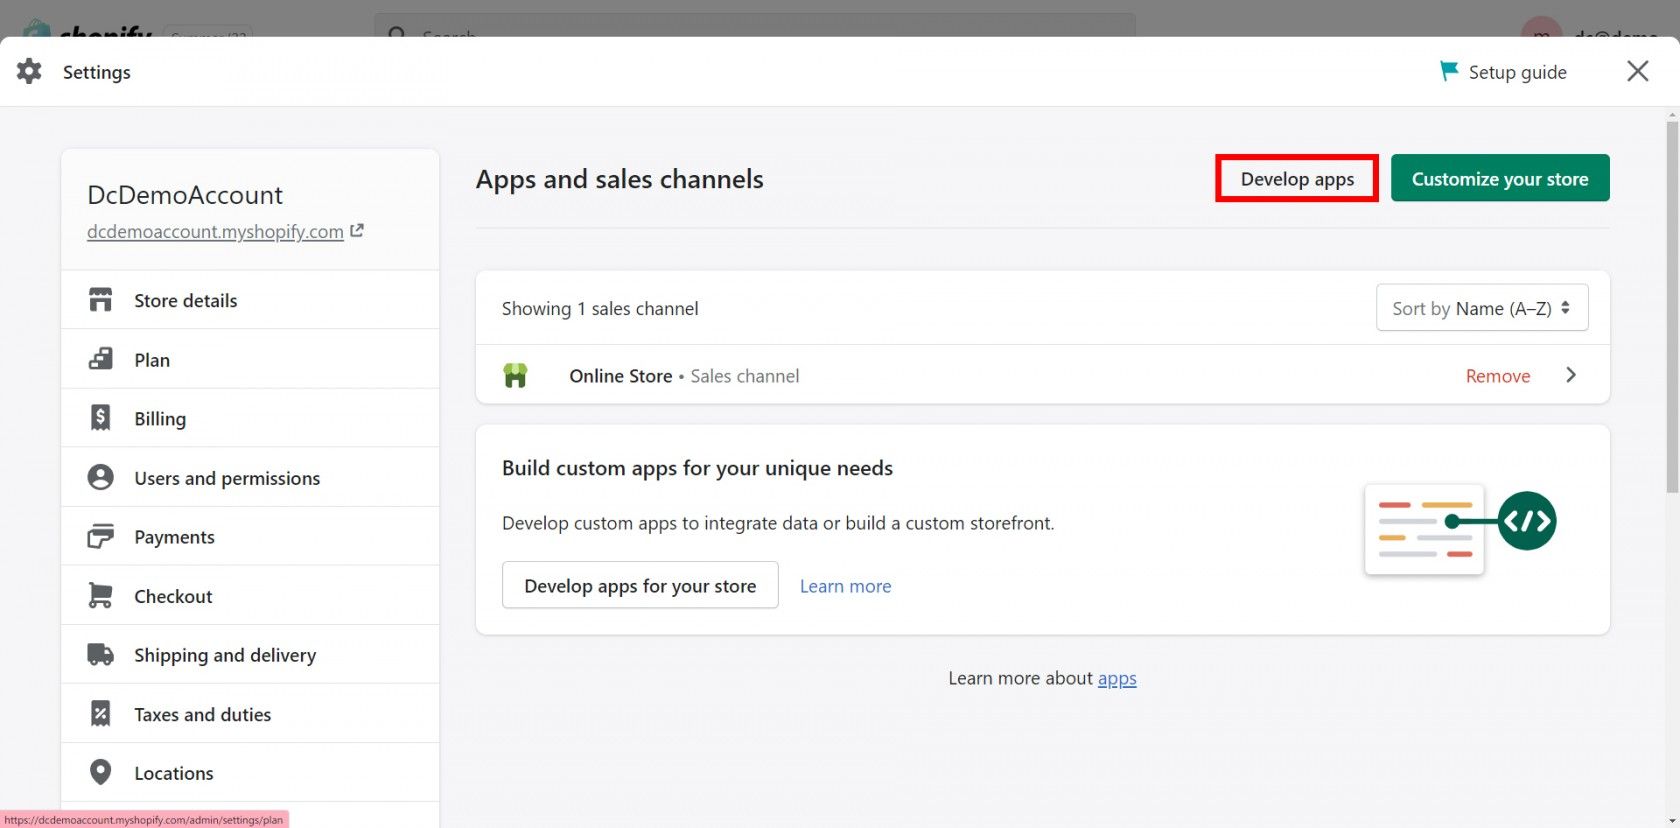
Click to maximise the image
If this is your first app, click Allow custom app development.
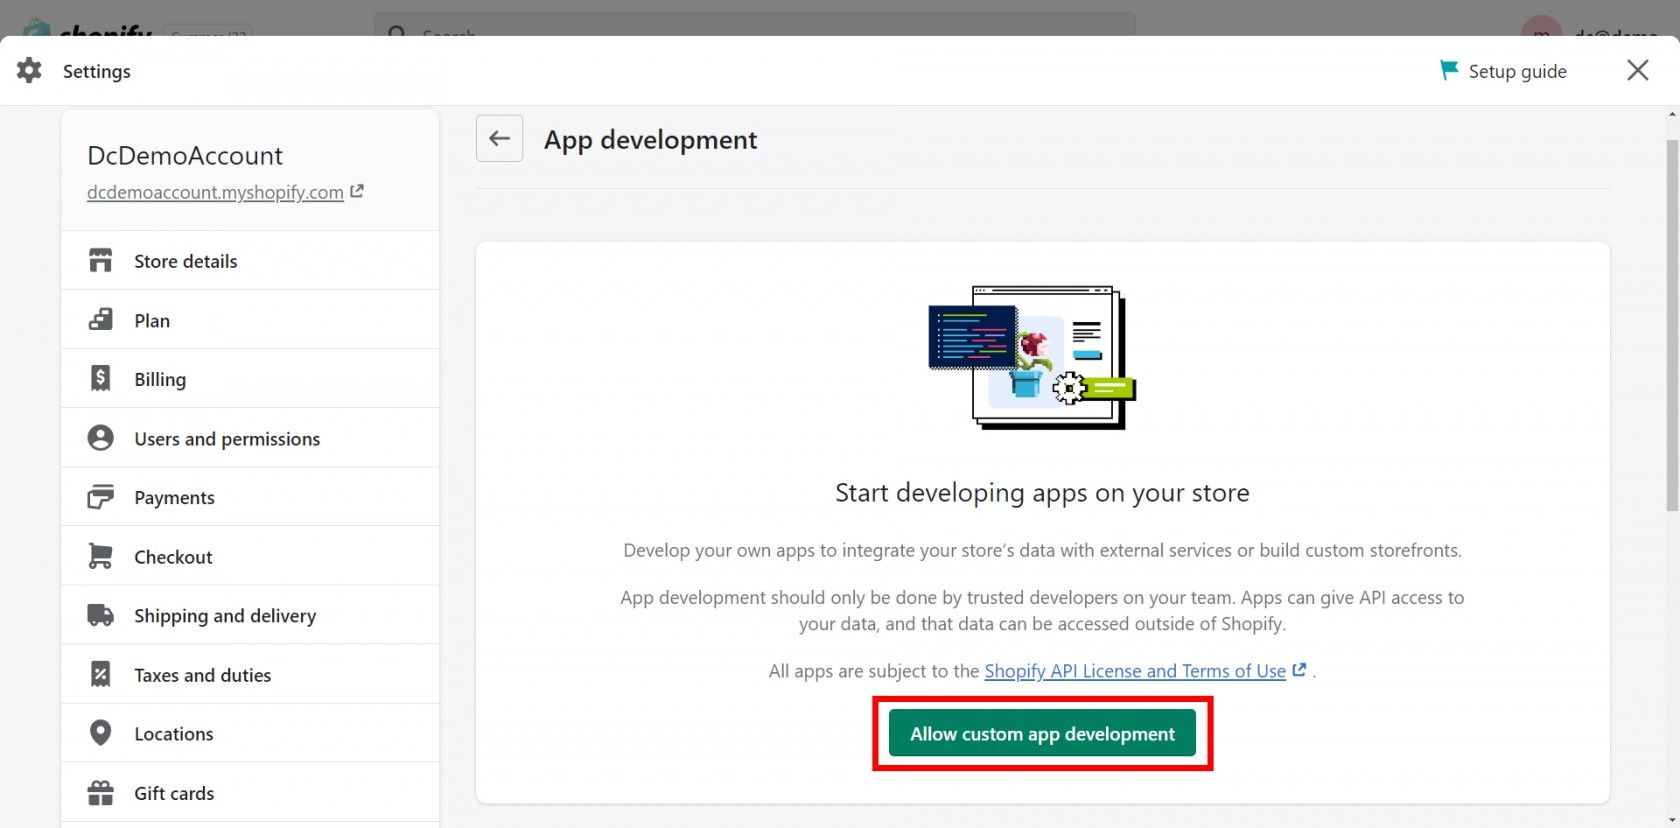
Click to maximise the image
Then click on the "Allow custom app development" button again.
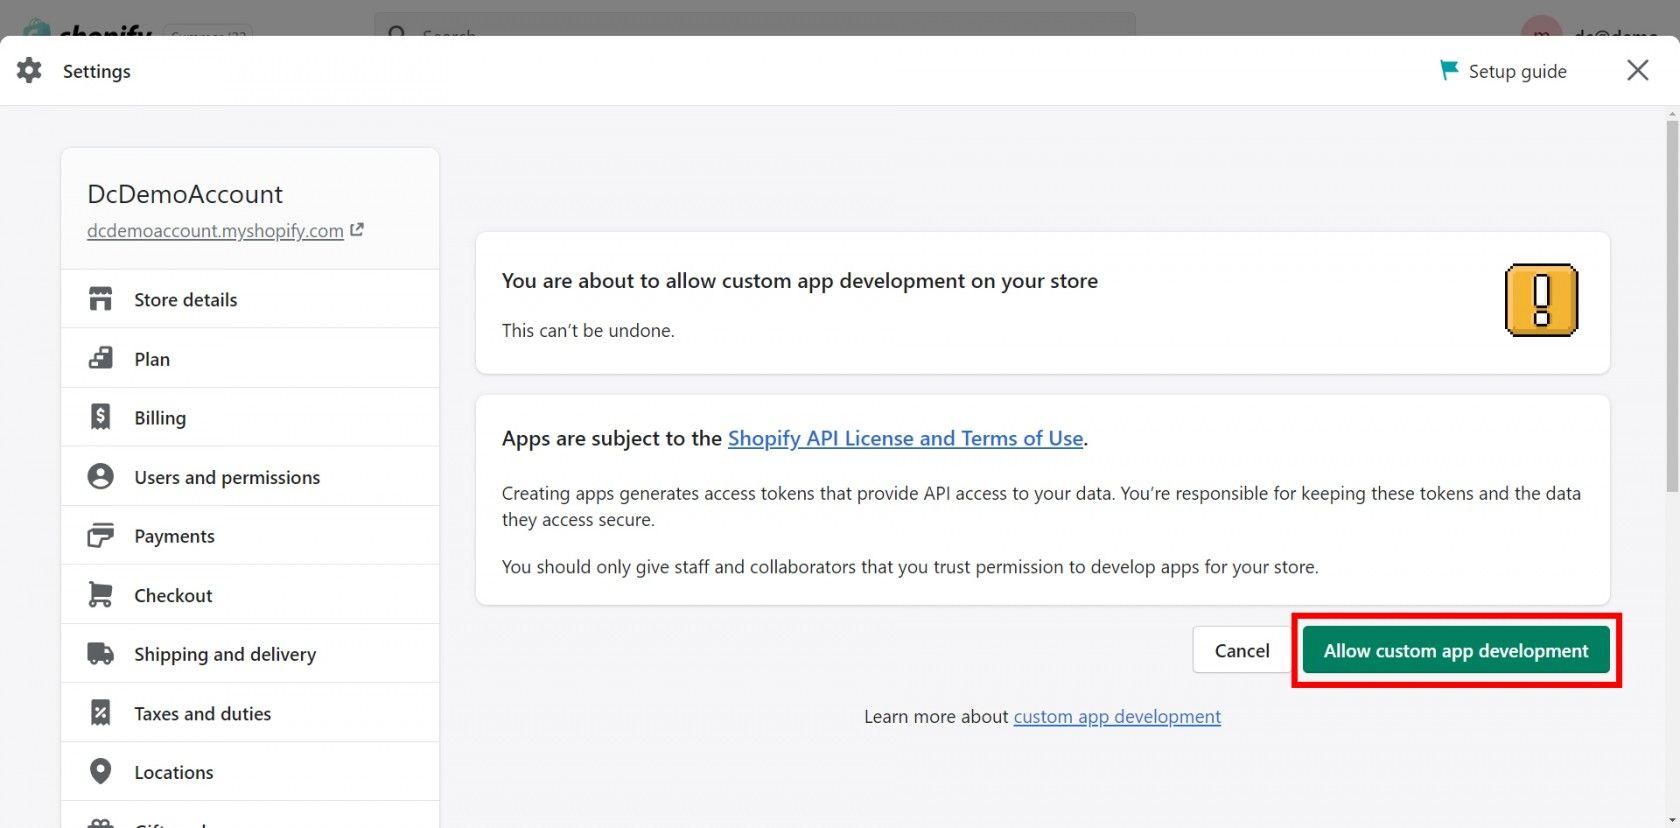
Click to maximise the image
Click Create an app.
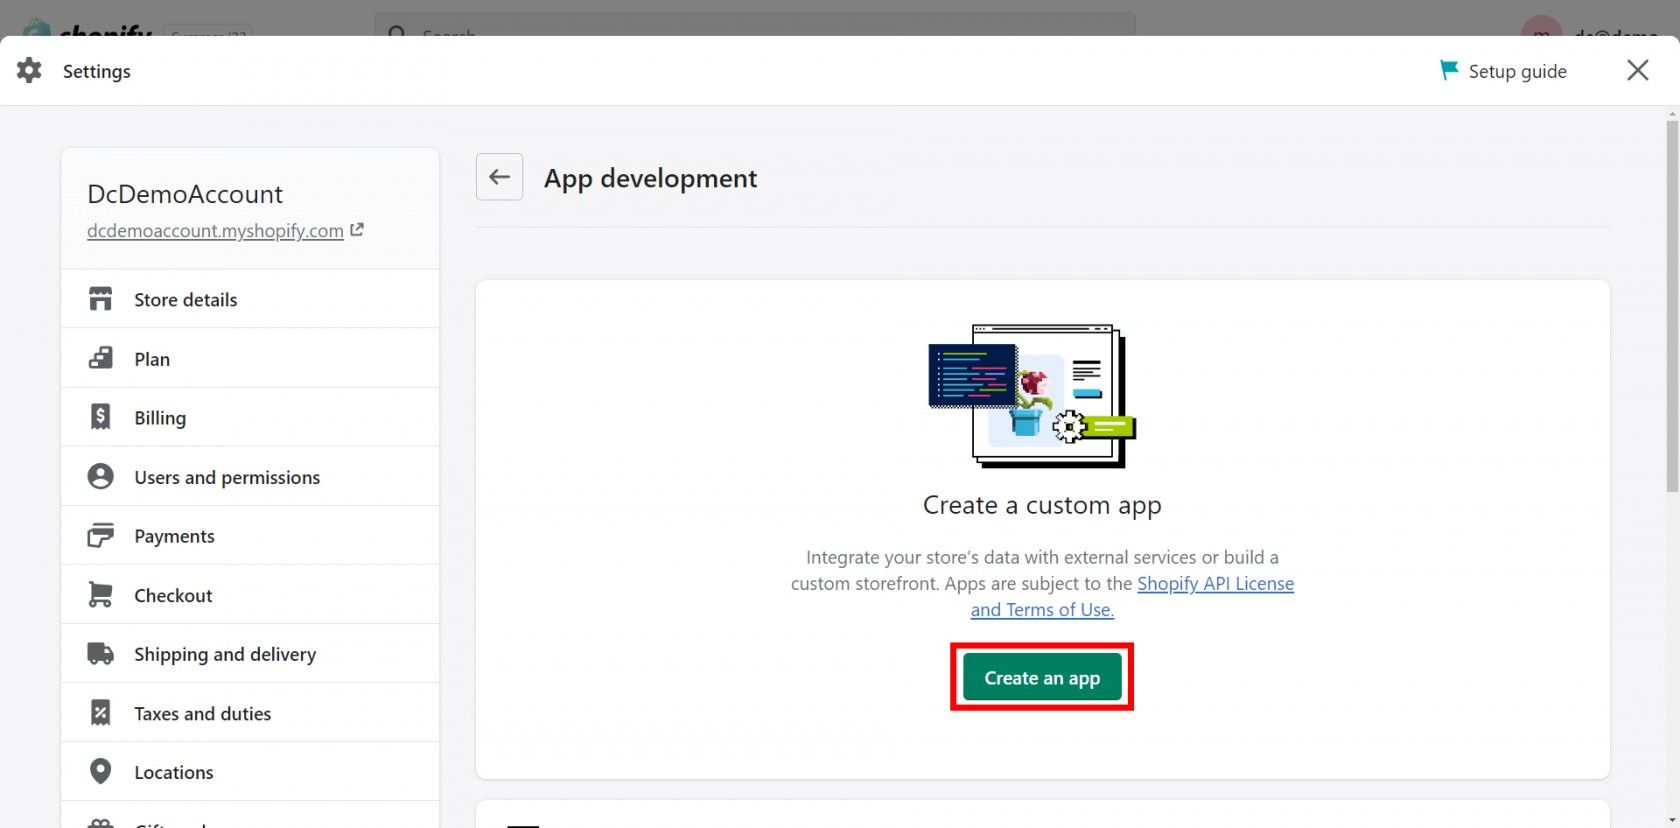
Click to maximise the image
Enter an App name and select the App developer (defaults to your user).
Click Create app.
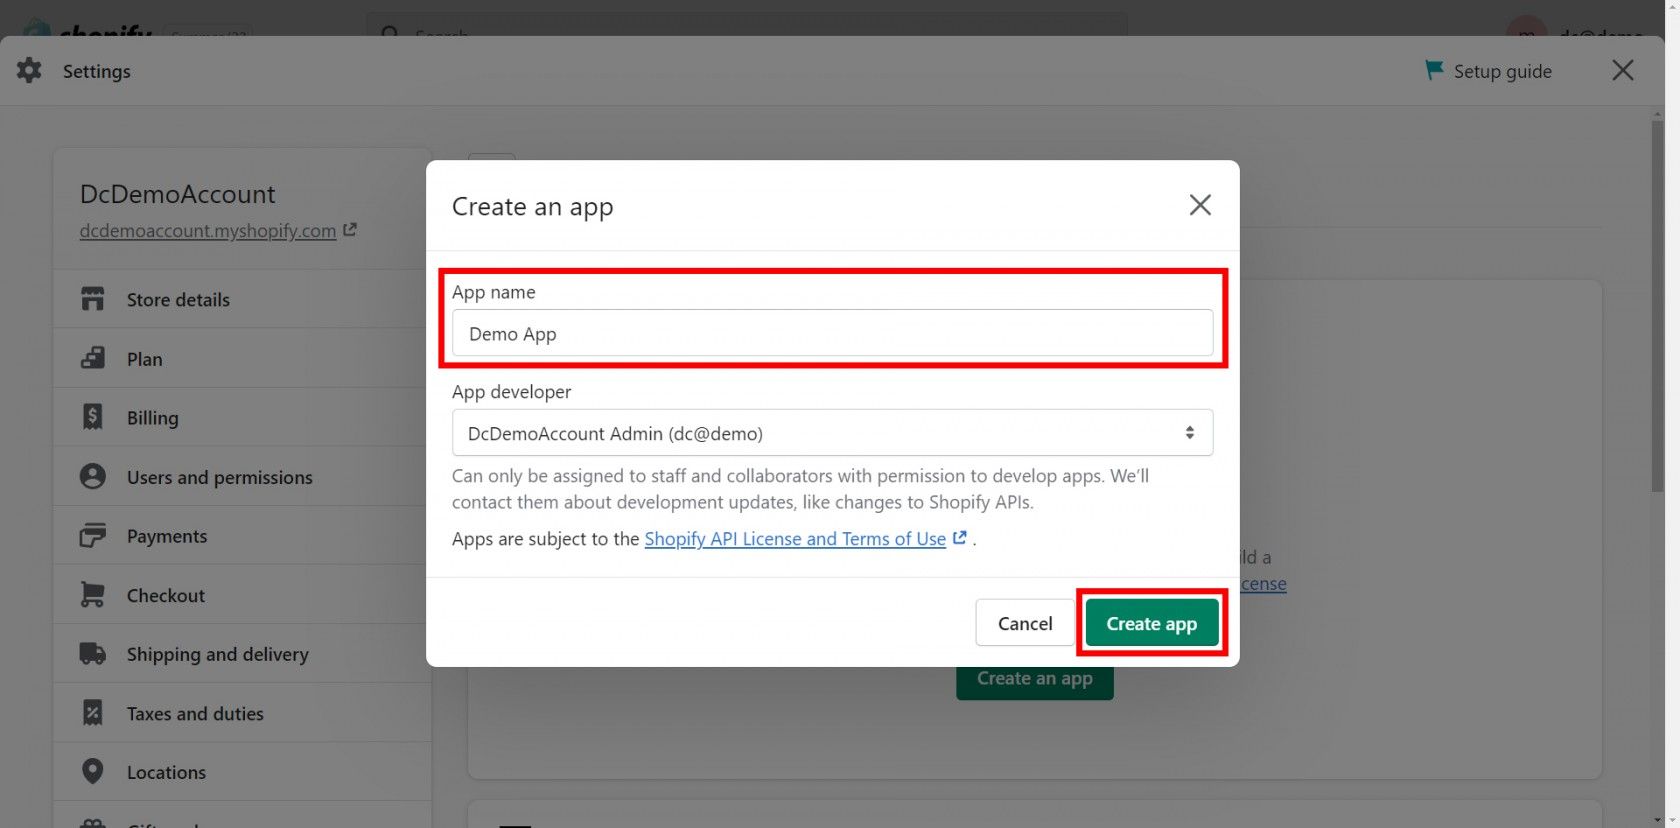
Click to maximise the image
Step 3: Assign Admin API Scopes
After creating the app, click Configure Admin API scopes.
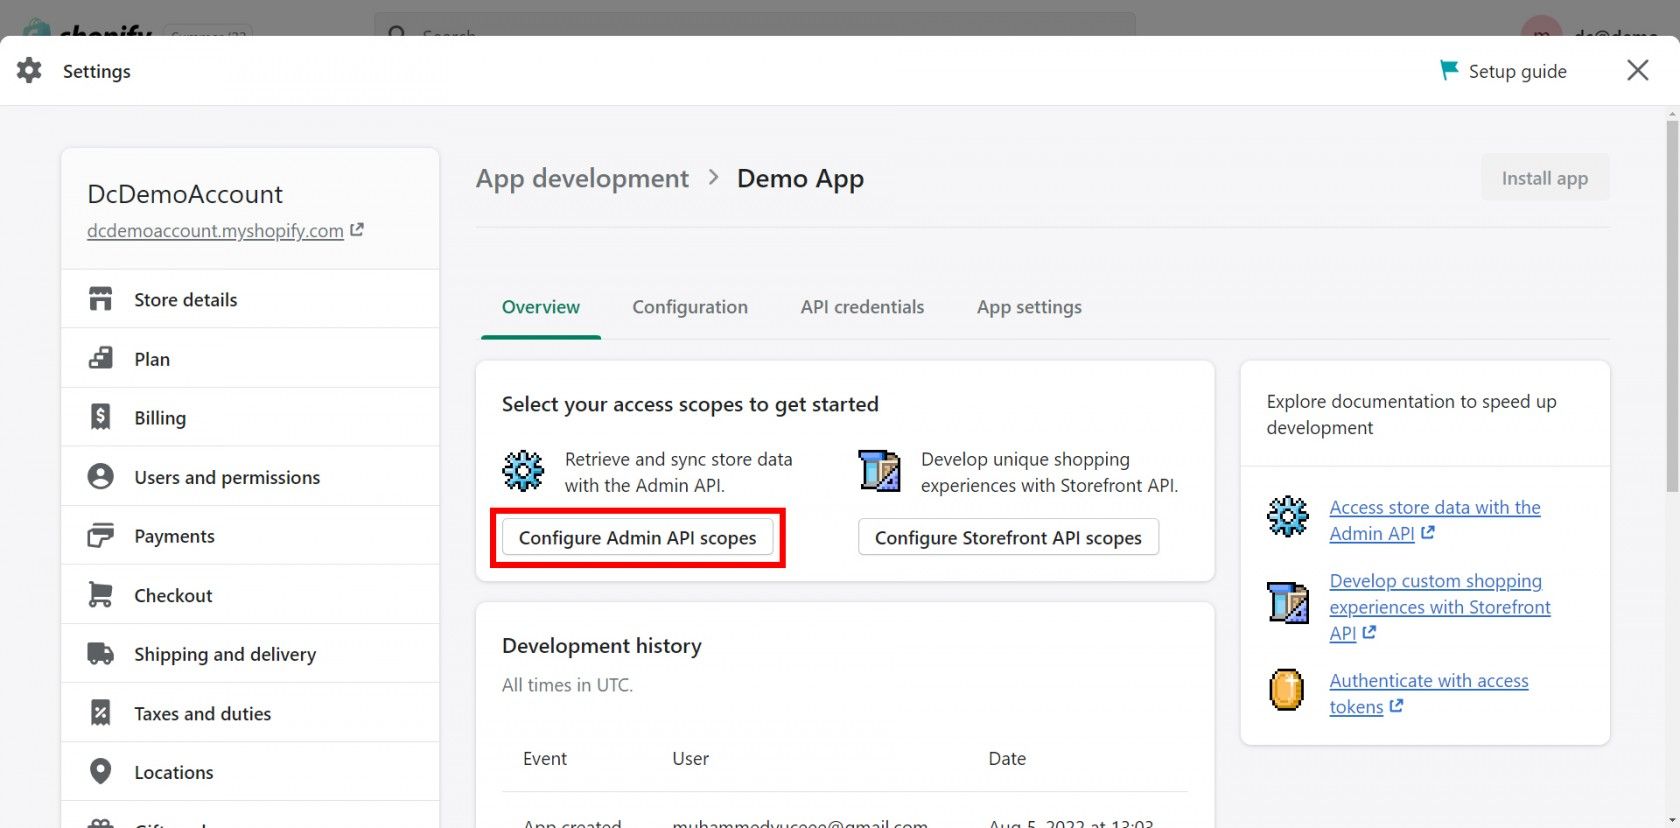
Click to maximise the image
In the Admin API access scopes section, tick the boxes for the following permissions:
Click to maximise the image
Click Save (top right corner).
Step 4: Install the App and Retrieve Credentials
Click Install app in the top right corner.
Confirm by clicking Install again when prompted.
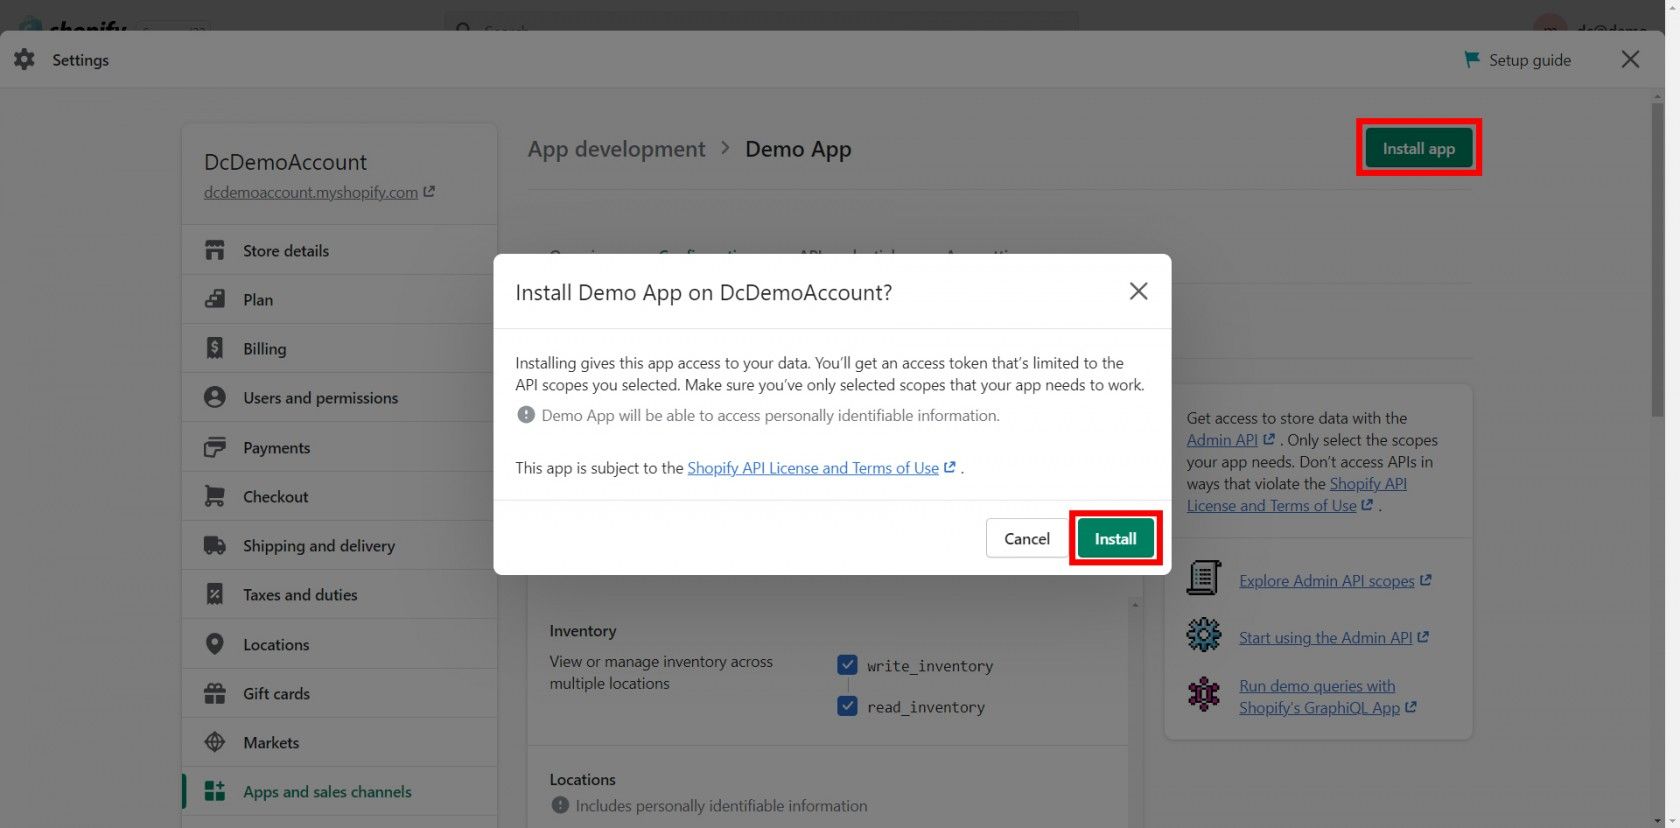
Click to maximise the image
Click Reveal token once to view your Admin API Access Token — copy this securely.
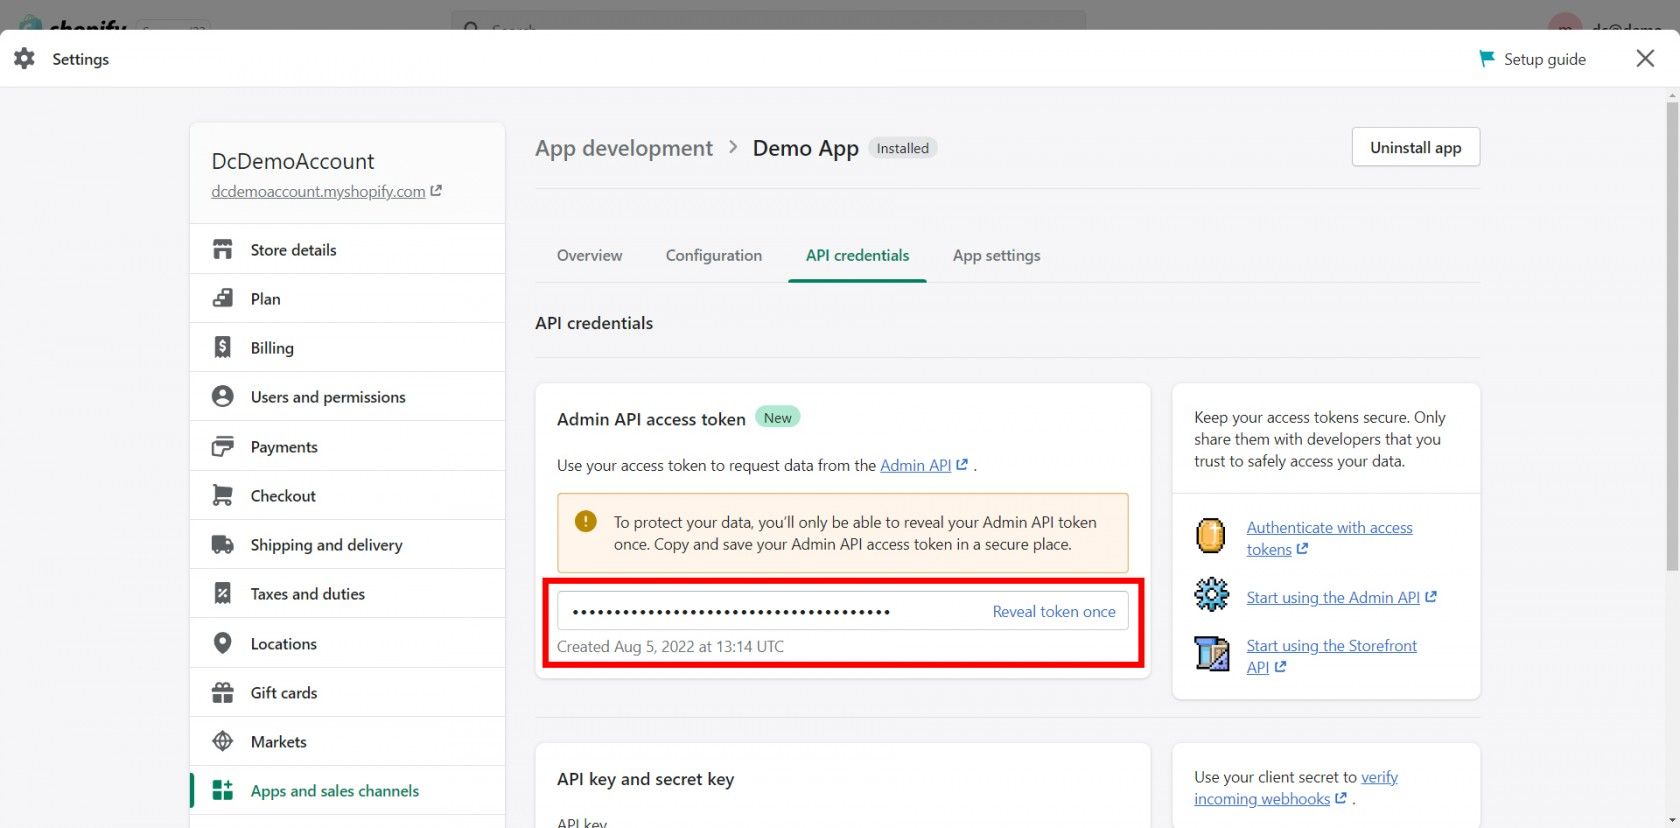
Click to maximise the image
Locate your Shopify Hostname from the URL.
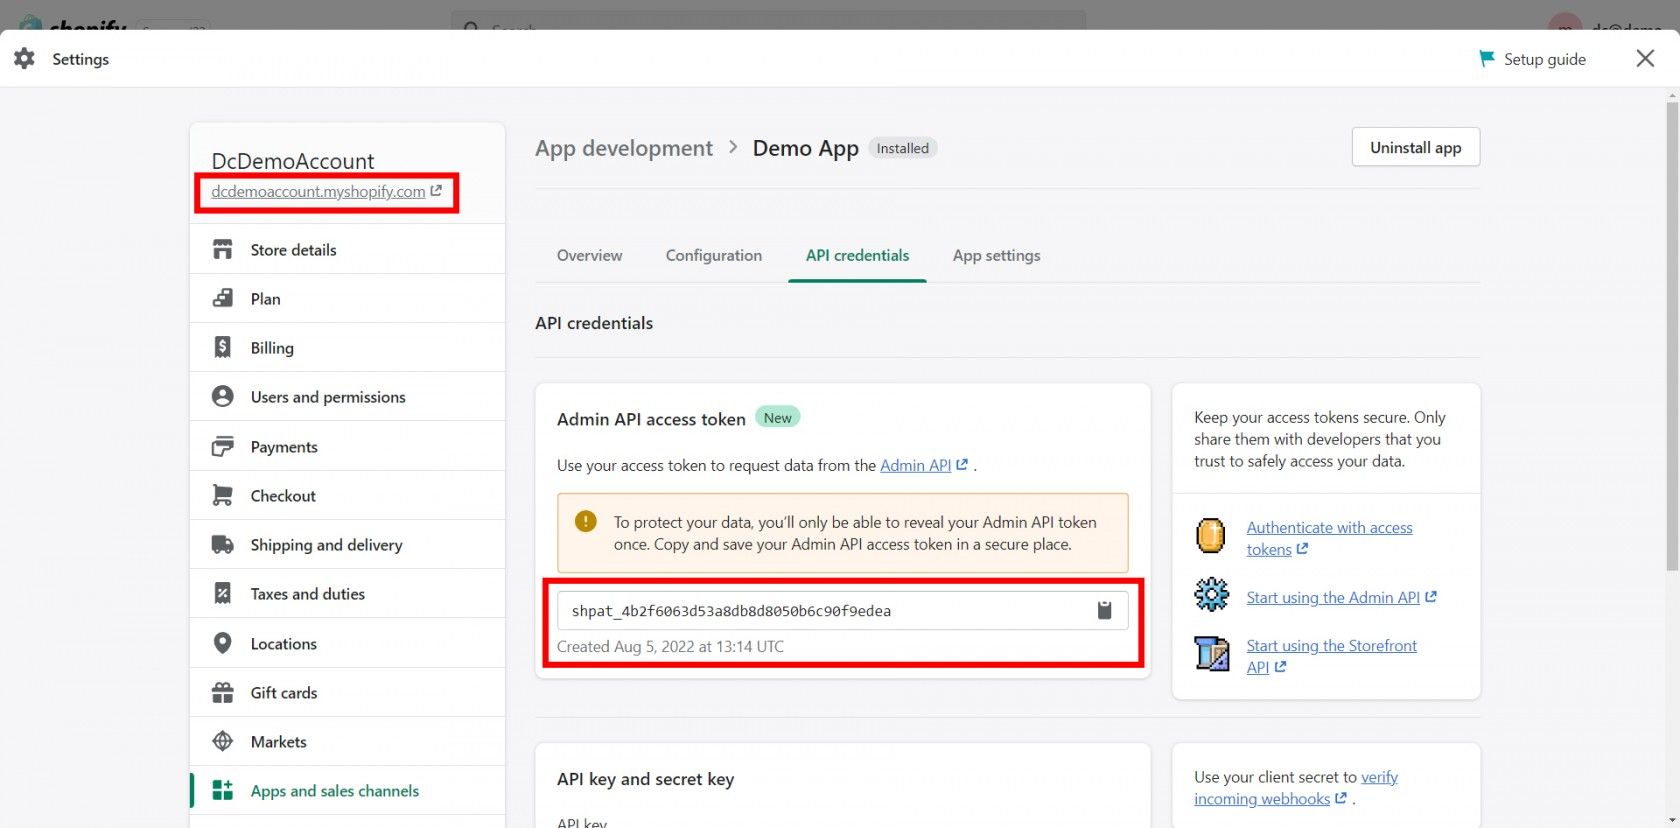
Click to maximise the image
Format:
yourstorename.myshopify.comOnly enter
yourstorenamein the Hostname field in Helm.
Step 5: Complete the Integration in Helm
Return to the Helm Shopify integration form and complete the following fields:
🛑 Note:
If you're using the Access Token method, you do not need to provide an API Key or Password.
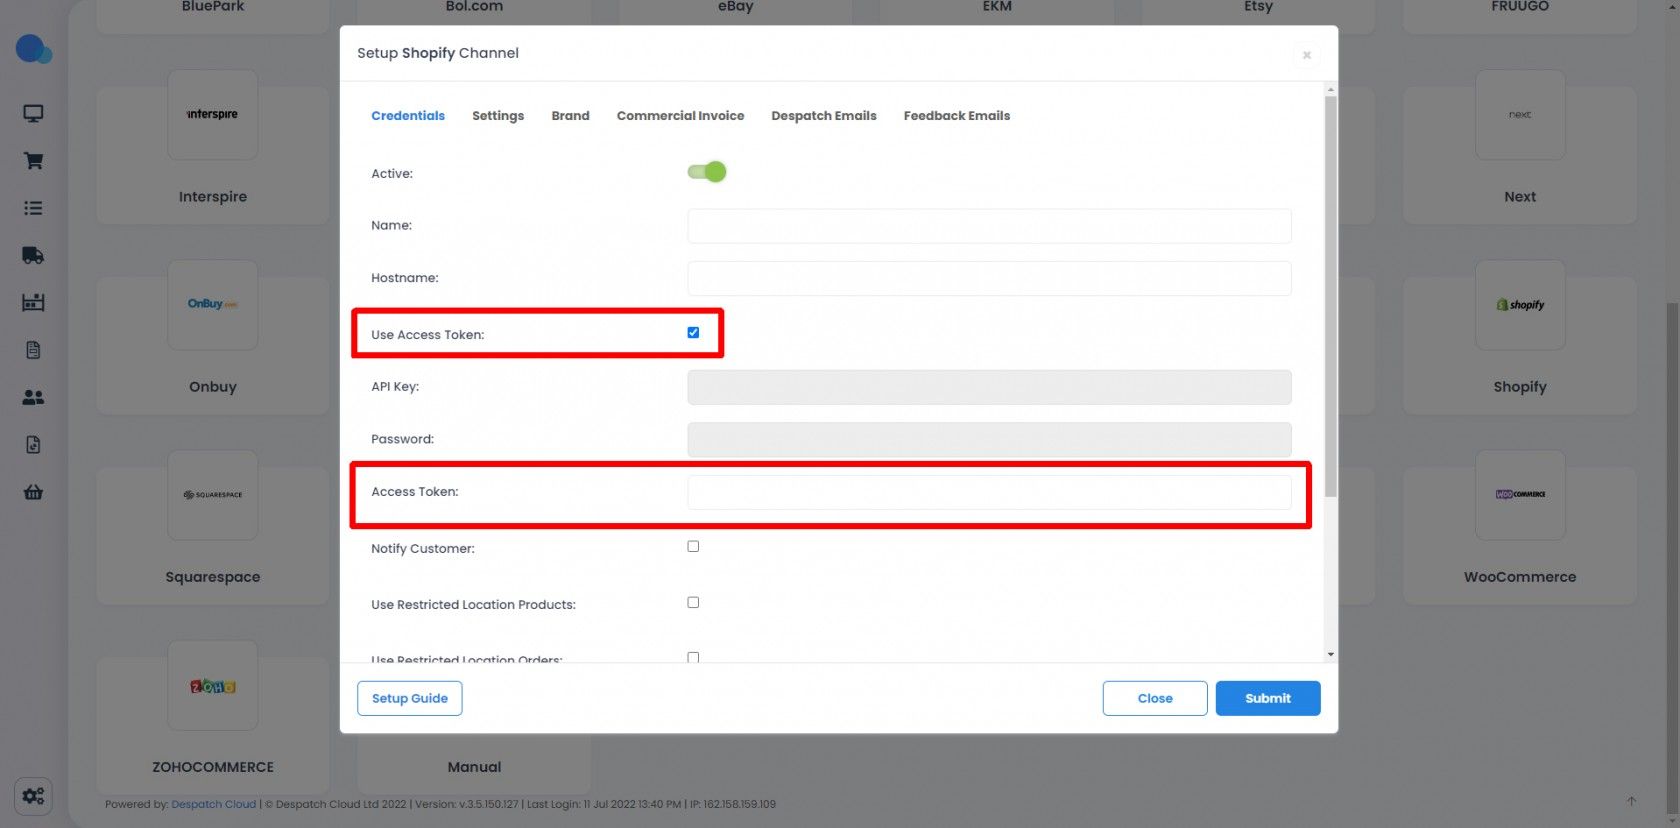
Click to maximise the image
Step 6: Configure Settings
Enable the Active toggle to activate the channel.
Configure any additional options as required:
Settings – Select your warehouse and its preferences.
Stock Control – Toggle Auto Sync Stock.
Brand – Assign brand information for this sales channel.
Commercial Invoice – Customise invoice details if required.
Despatch Emails – Enable shipment tracking emails.
Feedback Emails – Set up post-order feedback messages.
Enable - any of the other additional settings.
Step 7: Finalise the Integration
Once all fields are complete, click Submit.
A success message will confirm your Shopify store is now connected.
Orders and stock data will now sync between Shopify and Helm automatically.
Completion
You’ve now successfully integrated your Shopify store with Helm.
Ensure your API token remains secure, and review your channel settings periodically to align with your store’s operational needs.
