Interspire Integration Setup Guide
This guide walks you through the process of integrating Interspire with Helm. You will install an extension on your Interspire store, configure the connection, and enter the credentials required to activate the sales channel. Once complete, Helm will be able to synchronise orders and inventory directly with your Interspire platform
Last updated 9 months ago

Prerequisites
Before you begin:
Ensure you have administrative access to both Helm and your Interspire installation.
You will need access to your Interspire server and database credentials.
You must request the Helm extension for Interspire by emailing us.

Step 1: Request and Prepare the Extension
Email to request the Helm Interspire Extension file.
Once received, open the extension configuration file using a text editor.
Locate and update the following lines with your own values:
dbhost: Your Interspire database host URL.dbusername: The database username for your Interspire installation.dbpassword: Your Interspire database password.dbdatabase: The name of your Interspire database.dbprefix: Your database prefix (this can be found in your Interspire config file if unknown).api_key: A custom API key you will also use later when setting up the channel in Helm.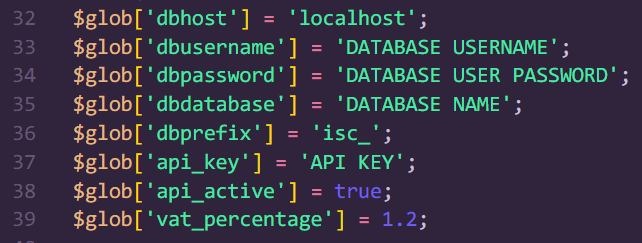
Save the file after editing.
Move the edited file into your Interspire installation directory.
You may need to restart Interspire after placing the extension file in the correct folder.
Step 2: Configure the Interspire Sales Channel in Helm
Log in to your Helm account.
Navigate to Settings in the bottom-left corner of the dashboard.
Go to Sales Channels and locate Interspire in the list of available integrations.
Click Install.
Step 3: Enter Integration Details
Fill in the fields as follows:
Name – A meaningful name for the channel (e.g. Interspire Store).
Store URL – The same URL you entered in the
dbhostfield earlier.API Key – The same value you set in the
api_keyfield of the extension file.
Explore the configuration settings to further tailor and enhance your integration.
Click Settings in the top tab and choose the warehouse from which goods will be despatched for this integration.
Explore the configuration settings to further tailor and enhance your integration.
Optional configuration tabs include:
Stock Control – Set up Auto Sync Stock.
Brand – Setup your Company Information for this sales channel below. By default your Company Information as set in General Settings will be used.
Commercial Invoice – Setup your Commercial Invoice Information for this sales channel below. By default your Commercial Invoice Information as set in General Settings will be used.
Despatch Emails – Do you want Helm to send out an order despatched email with carrier tracking information (if applicable)? If you do setup your Despatch Email for this sales channel below.
Feedback Emails – Do you want Helm to send out an order feedback email? If you do, setup your Despatch Email for this sales channel below.
Adjust these according to your business requirements.
Once all fields are complete, click Submit to finalise the setup.
A confirmation message will appear once the channel is successfully connected.
Completion
Your Interspire sales channel is now active in Helm. Orders and stock data will begin synchronising automatically.
Additional Notes
If you encounter errors during setup, confirm all credentials and file locations are correct.
You can update or reinstall the Interspire integration at any time from the Sales Channels section in Helm.
Always retain a backup of your configuration file before making changes.